This guide is outdated; it shows the steps I go through when building JayCG’s version of RuneLite.
Because of constantly changing actions needed to build the RL version you won’t get a working client by following this guide.
However the part about how I use .bat files to launch my RL clients is still very relevant.
If you want to get the up to date version of my RL client & want to get involved click this discord link:
https://discord.gg/PbsTV6g84Z
Introduction
I just want to preface this guide by saying that I will not go in-depth into the different steps.
The main goal of this guide is to show you guys how to build the custom version of JayCG’s RuneLite and update it when needed.
Why JayCG’s custom RuneLite?
With JayCG’s version of RuneLite you can quickly login your accounts by passing your username and password as one of the arguments in a .bat you use to run RuneLite.
Other arguments that can be entered are:
- a custom default world per client
- RuneLite developer-mode
- The title of RuneLite
- x coordinate of the client
- y coordinate of the client
The other big benefit is the availability of a limit fps tickbox which will limit the framerate of RuneLite on startup.
Downloading and installing IntelliJ
Download the community version of IntelliJ here.
When running the .exe use the default settings.
Building JayCG’s RuneLite
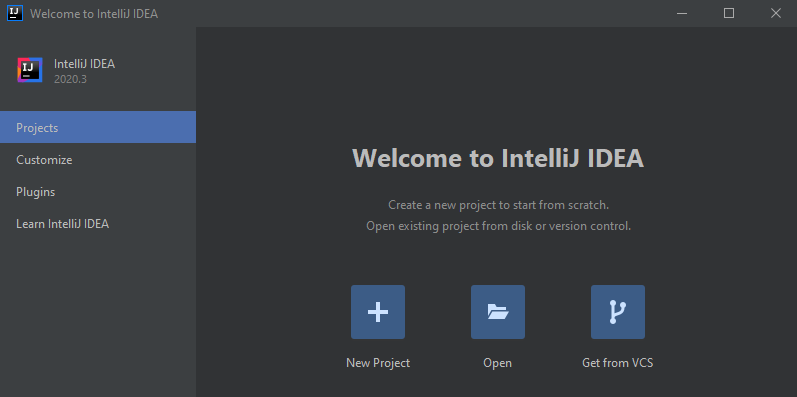
After having IntelliJ downloaded run it.
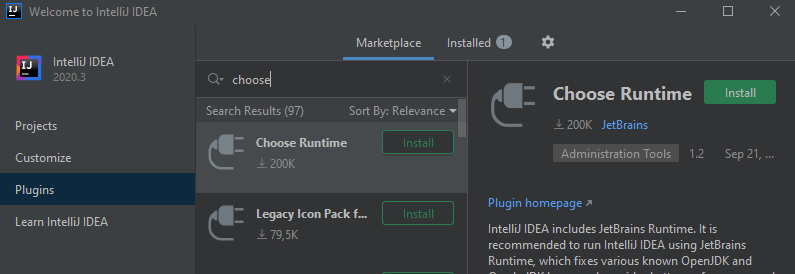
Go to the “Plugins” tab and search for “Choose Runtime” and install it.
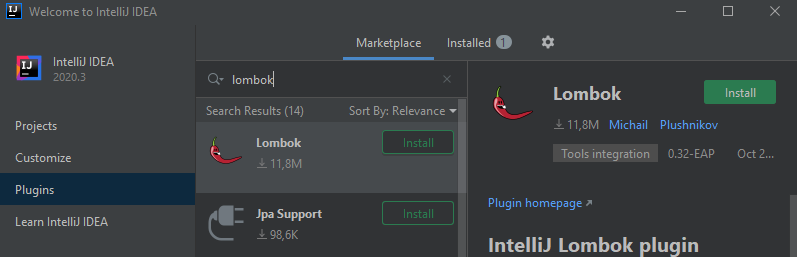
Search for “Lombok” and install it as well.
Go back to the “Projects” tab and press the “Get from VCS” button.
Enter the following details. The directory doesn’t really matter just put it at a convenient place; I left it at the default setting here then press the “Download and install” button.
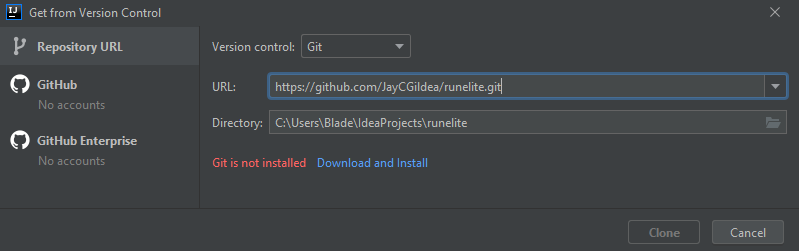
Press the “Clone” button.

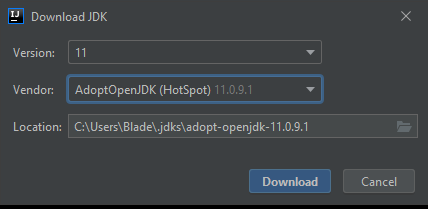
This process takes a while; after a few minutes you should see the runelite home directory, now go to “File>Project Structure”.

Go to the “Project” tab and under the “Project SDK” select the dropdown. Hover over “Add SDK” and press “Download JDK…”.

Under the “Download JDK” go through the dropdowns and set it as the following:
Version: 11
Vendor: AdaptOpenJDK (HotSpot)
Location: Leave to default
Press download.
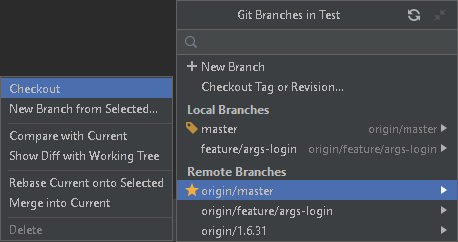
In the bottom right click “master” and click on “origin/feature/args-login” and press “Checkout”.

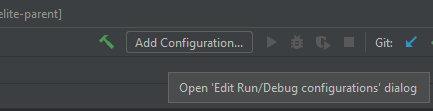
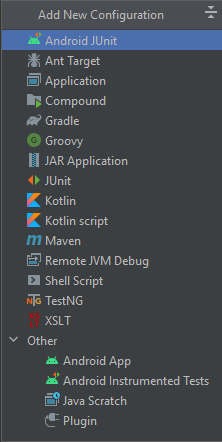
Press “Add Configuration…” in the top bar of IntelliJ.
Press the “+” icon in the top left.
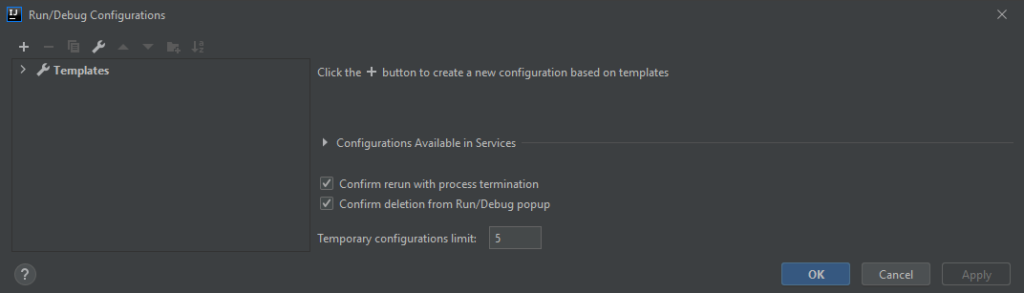
Select “Maven” in the dropdown.
Fill in the lines for the next prompts:
Name: “runelite-parent [install]”
Working directory: press the folder icon with the blue square to the right and select “runelite-parent”.
Command line: “install -DskipTests -f pom.xml”
Press “OK”.
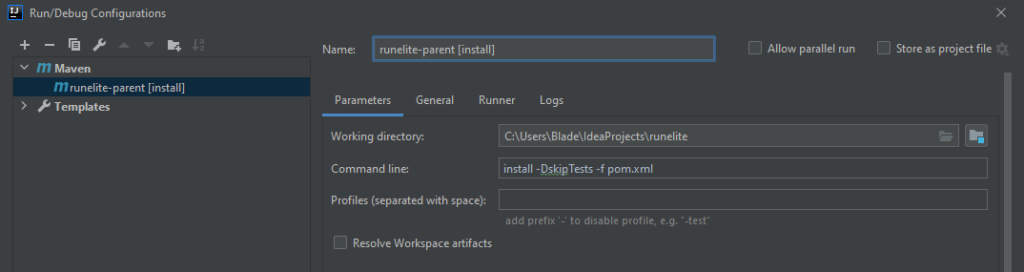
Press the green play button (there should be the blue M with “runelite-parent [install]” to the left of it).

Navigate to “runelite runelite-parent>runelite-client client>target”.
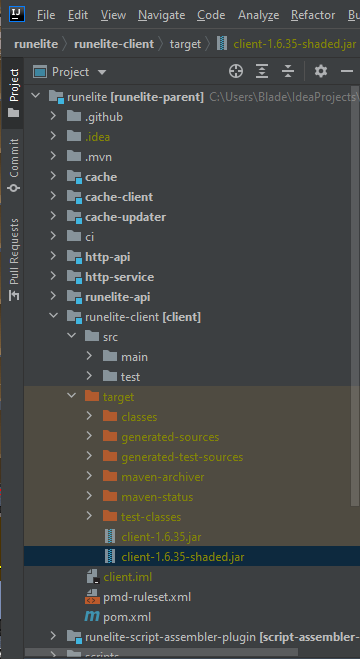
Right click the shaded .jar navigate to “Open In” and press “Explorer”. In the explorer copy the shaded.jar.
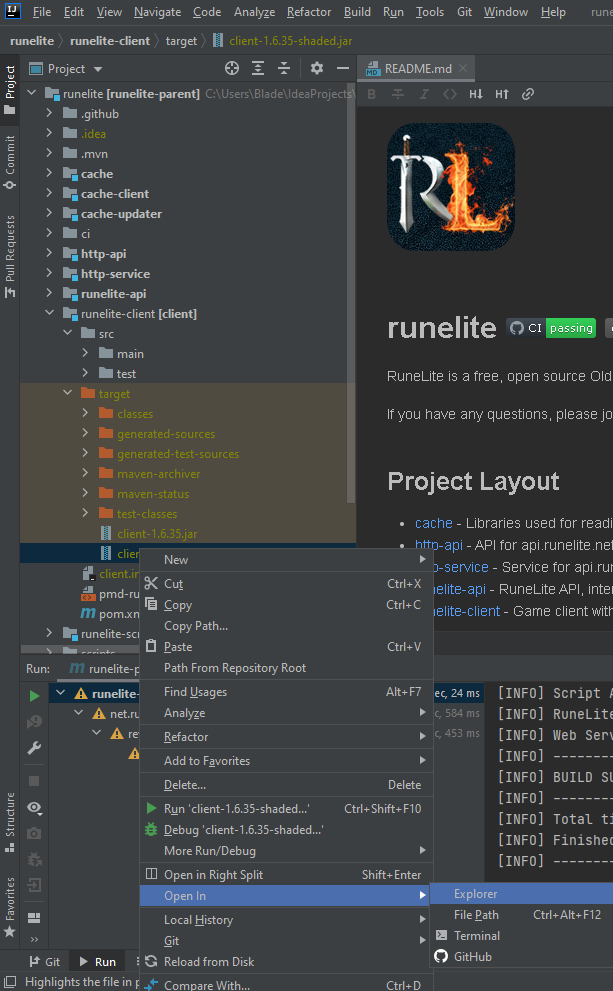
Create a folder on your desktop; or anywhere else and name it “RunAccs”. Inside this folder create a folder called “BatFiles”. Paste the shaded.jar file in the “RunAccs\BatFiles” folder.
Rename the “shaded.jar” to “RuneLite.jar”.
How to launch RuneLite through a .bat file
Copy the text below into a new .txt file (Notepad). Save the .bat file in the “RunAccs\BatFiles”, the same folder as the .jar file.
Now when you double click the .bat file RuneLite will open up.
You can create a .bat file for each of your RuneScape accounts to set different worlds/usernames/passwords or other settings.
.bat file
start javaw -jar -ea RuneLite.jar
How to launch RuneLite through a .bat file with 32 bit Java
Before doing anything make sure your file extensions are enabled in Windows 10.
You can enable this in Windows Explorer > View > Check “File name extensions.
Running RuneLite through 32 bit java will significantly lower your RAM usage.
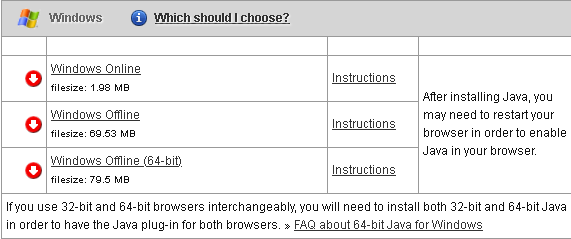
Download 32 bit java from here (Windows Offline, NOT Windows Offline (64-bit)) .
Install java 32 bits.
Press windows key + environment and select “Edit the system environment variables”.

Click “Environment Variables…” in the bottom.
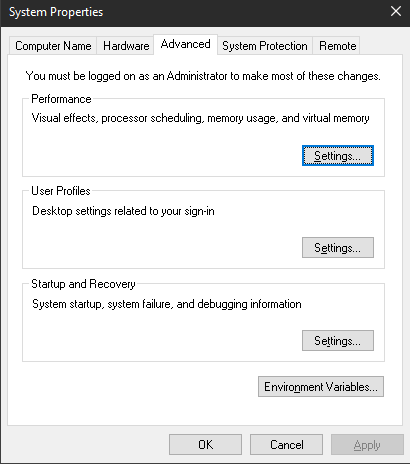
Under System Variables edit “JAVA_HOME” if it doesn’t exist make the variable. Then navigate to the 32 bit installation folder of jre (Program Files (x86)). Don’t select a jre folder from Program Files as that is the 64 bit installation folder.

Now when you run a .bat to launch RuneLite it will use 32 bit java saving you a lot of memory usage.
Arguments
Example
Any of the arguments described here can be added to the .bat file we made earlier. With these arguments you can change settings of the RuneLite window.
Arguments are simply added after the line “start javaw -jar -ea RuneLite.jar”.
Below is an example of a .bat file which will set the world to 308 after pressing enter on the login screen.
Example .bat
start javaw -jar -ea RuneLite.jar --world="308"
Username & Password
With these arguments you can configure the username & password that instantly get filled in when pressing enter on login screen in RuneLite.
Password argument (instant entry after pressing enter on login screen)
--password="password"
Full .bat example
start javaw -jar -ea RuneLite.jar --password="password"
Username argument (instant entry after pressing enter on login screen)
--username="username@gmail.com"
Full .bat example
start javaw -jar -ea RuneLite.jar --username="username@gmail.com"
Default world
With this argument you can configure the world when pressing enter on login screen in RuneLite.
World argument (changes world on pressing enter on login screen)
--world="308"
Full .bat example
start javaw -jar -ea RuneLite.jar --world="308"
RuneLite Window Title
With this argument you can configure the RuneLite window title.
RuneLite window title argument
--startupTitle="RuneLite Title"
Full .bat example
start javaw -Drunelite.pluginhub.version=1.6.33 -jar -ea RuneLite.jar --startupTitle="RuneLite Title"
X & Y coordinate of RuneLite window
With these arguments you can configure the X & Y coordinates of the RuneLite window when pressing enter on login screen.
xPos (pixel coordinate on horizontal axis)
--xPos="0"
Full .bat example
start javaw -jar -ea RuneLite.jar --xPos="0"
yPos (pixel coordinate on vertical axis)
--yPos="0"
Full .bat example
start javaw -jar -ea RuneLite.jar --yPos="0"
Developer Mode
With this argument you can enable developer mode when pressing enter on login screen in RuneLite.
Enable developer mode
--developer-mode
Full .bat example
start javaw -Drunelite.pluginhub.version=1.6.33 -jar -ea RuneLite.jar --developer-mode
Using AHK to launch multiple clients at once by running the script or using a keyboard button.
Download and install AHK.
Now right click your desktop select create new AHK file and copy paste the contents from below in it.
If you double click the file the RuneLite clients defined in the script will start, you can repeat the lines below as as many times as you want for different .bat files.
Make sure to change the file path after Run to match with your computer setup & change the !(WinExist(“”) to match the name of your RuneLite window title (when logged in or configured through an argument) so that the script can check if the RuneLite window is already open. You can also choose to remove the if statement alltogether if you don’t care about having multiple instances of the same .bat file open. And just use the Run line(s).
You can also configure a hotkey to run the accounts. Just check the 2nd example below.
Run ” 1 – RuneLite – Agonic Blade.bat” if there is no window with the title “RuneLite – Agonic Blade”
And run ” 1 – RuneLite – Antic Blade.bat” if there is no window with the title “RuneLite – Antic Blade”
if !(WinExist("RuneLite - Agonic Blade"))
Run, "C:\Users\Blade\Desktop\RunAccs\BatFiles\1 - RuneLite - Agonic Blade.bat", C:\Users\Blade\Desktop\RunAccs\BatFiles, hide
if !(WinExist("RuneLite - Antic Blade"))
Run, "C:\Users\Blade\Desktop\RunAccs\BatFiles\1 - RuneLite - Antic Blade.bat", C:\Users\Blade\Desktop\RunAccs\BatFiles, hide
You can also configure a hotkey to run the accounts. Just check the 2nd example below.
Run ” 1 – RuneLite – Agonic Blade.bat” if there is no window with the title “RuneLite – Agonic Blade” with F8
And run ” 1 – RuneLite – Antic Blade.bat” if there is no window with the title “RuneLite – Antic Blade” with F8
F8::

if !(WinExist(“RuneLite – Agonic Blade”))

Run, “C:\Users\Blade\Desktop\RunAccs\BatFiles\1 – RuneLite – Agonic Blade.bat”, C:\Users\Blade\Desktop\RunAccs\BatFiles, hide

if !(WinExist(“RuneLite – Antic Blade”))

Run, “C:\Users\Blade\Desktop\RunAccs\BatFiles\1 – RuneLite – Antic Blade.bat”, C:\Users\Blade\Desktop\RunAccs\BatFiles, hide

return
Updating JayCG’s RuneLite
Whenever RuneLite gets updated you have to rebuild the client and copy the shaded.jar again and place it in the BatFiles folder.
Follow the steps below to rebuild JayCG’s RuneLite.
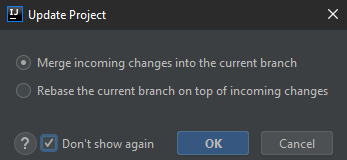
With IntelliJ open press the “Update Project…” button (blue arrow)

Tick the “Don’t show again” box & tick “Merge incoming changes into the current branch”
In the bottom right checkout the remote origin/master branch.
In the bottom right checkout the remote origin/features/args-login branch.

Then press the green button again to run “runelite-parent [install]”
Then copy the shaded.jar to your BatFiles folder on your desktop and rename it to: “RuneLite.jar”